Zoom is a cloud conferencing system that provides a video meeting space, lecture capture, and classroom environments. It allows for video, audio, and screen sharing between participants. It can be used from any computer, laptop, tablet, or phone, and it works on PC, Mac, Android and iOS devices.
Zoom Best Practices

Support
Activating Your Zoom Account
- Login to myCI.
- Click the Zoom button on the myCI portal. This will take you to your Zoom profile page.
Signing-in to the Zoom application
- First, download the Zoom application
- Mac: Zoom for Mac
- PC: Zoom for PC
- iOS: Zoom Cloud Meetings
- Android: Zoom Cloud Meetings
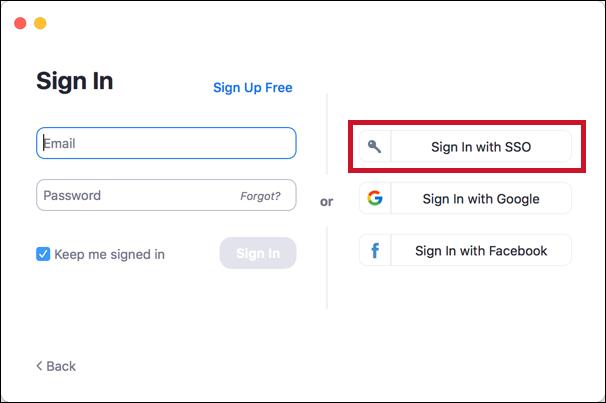
- Launch Zoom and select the Sign In with SSO button.
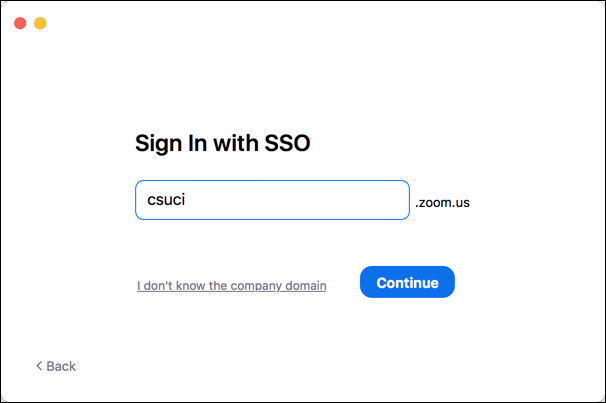
- Enter "csuci" for the company domain and then select the continue button.
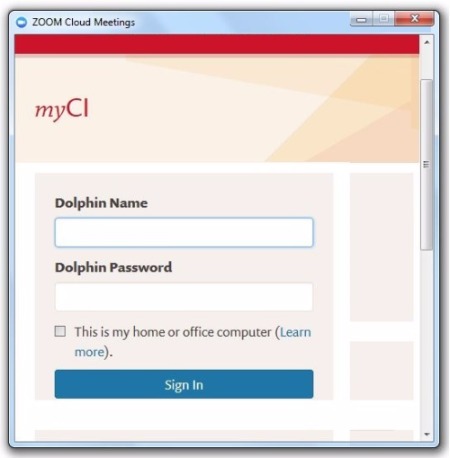
- You will be redirected to the myCI login page. Enter your myCI user name and password, then click the Sign In button.
- The zoom main window will appear with various options.
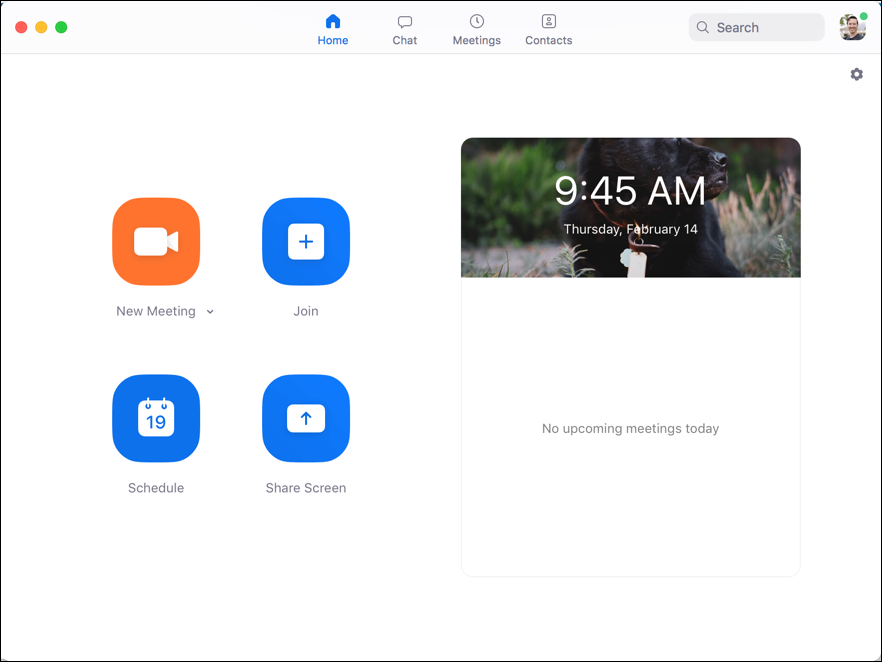
In Zoom there are two primary roles: the Host and the Participant. The host is the person who schedules the meeting to occur in his/her Zoom room. Participants include all individuals who join the meeting.
Scheduling a Meeting
You can schedule a meeting from the Zoom web portal or directly from the application.
From the Zoom Web Portal
- Login to Zoom via myCI
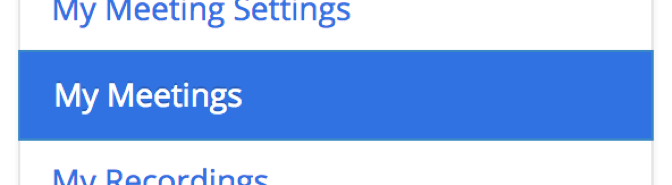
- Click ‘My Meetings’ on the left side of the page
- Give your meeting a title and select the meeting options you want enabled
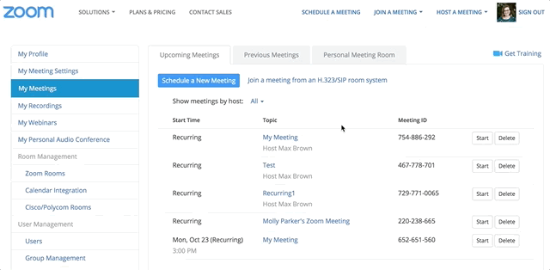
- Click ‘Save’ to finish
- Once finished, you can either select a calendar option to add the scheduled meeting to your calendar or select ‘Copy The Invitation’ to send out the invitation. Clicking ‘Copy the Invitation’ will open up a window where you can copy the full invitation to send out via email.
From the Zoom Application
- Launch the application on your computer
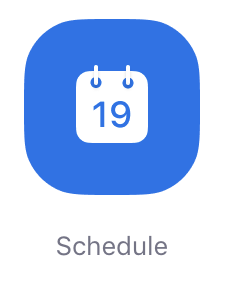
- Click the ‘Schedule’ button
- Select your meeting settings
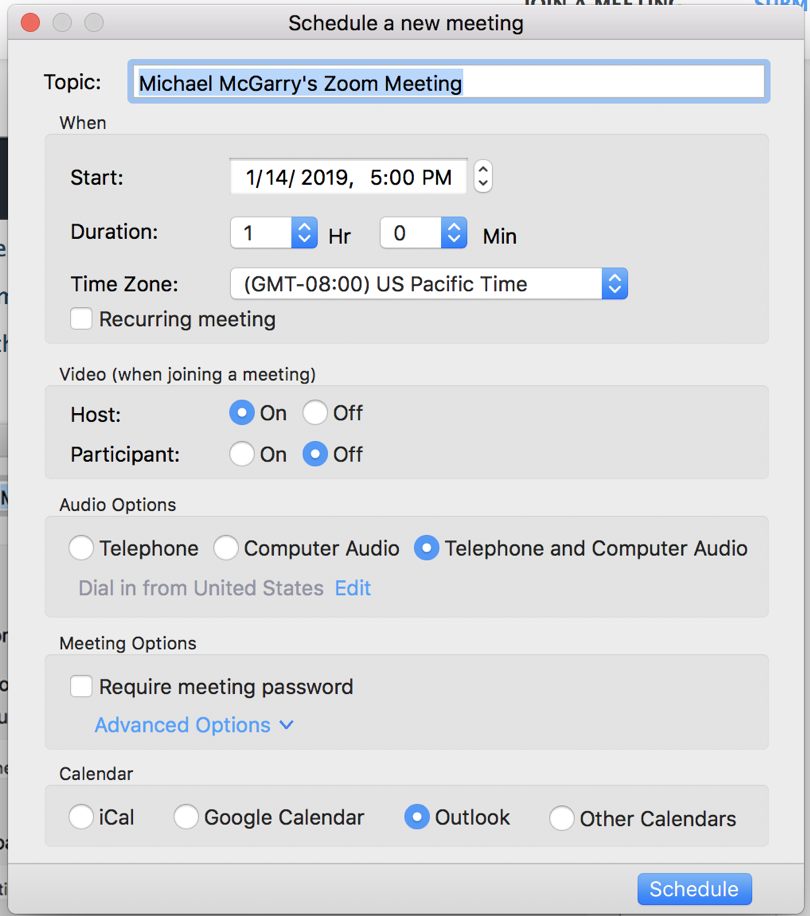
- Click the ‘Schedule’ button to finish
- The meeting will be scheduled and now appear in the ‘Meetings’ section of the application, located at the top of the Zoom window.

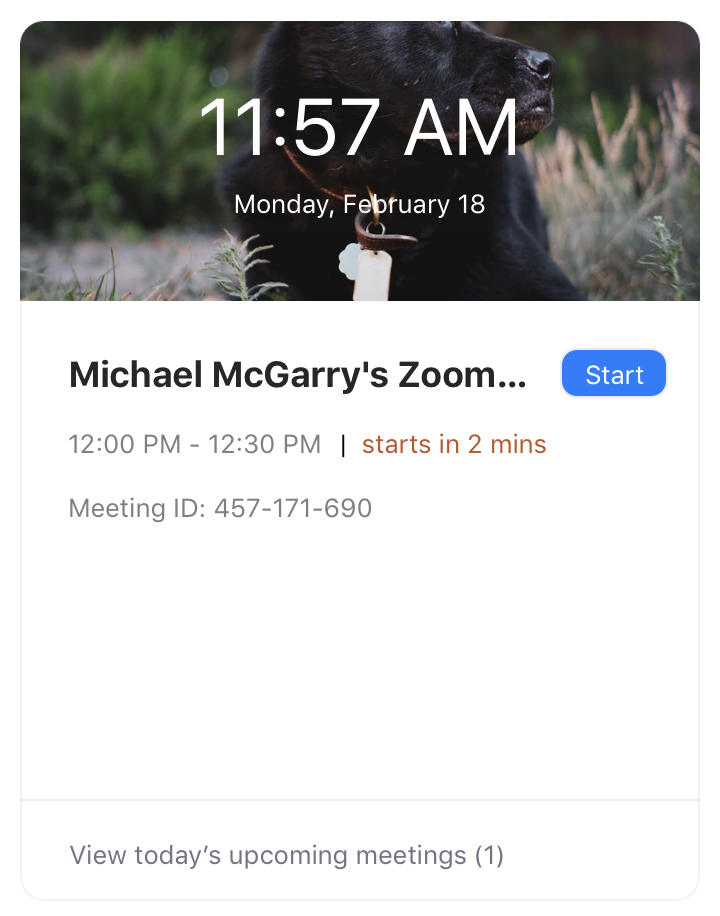
If you selected a calendar, such as Outlook, while scheduling, a new window will open where you can copy the meeting invitation. - Meetings that are scheduled for the current day will appear on the Zoom application's main screen in the upcoming meetings panel on the right
You can record a Zoom Meeting. Through your faculty or Staff Zoom account, you can choose to save your recording either to the Cloud or locally to your computer. With cloud recordings, you will receive an Email notification when your recording is ready, with a link to your recording. You can also locate your recording from your Zoom Profile. Students DO NOT have Cloud Recording, but they do have free Local Recording.
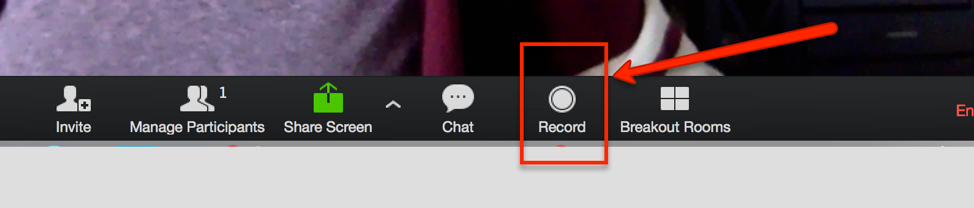
In Standard Meeting View
When in standard meeting view, the recording option is located at the bottom of your Zoom window.
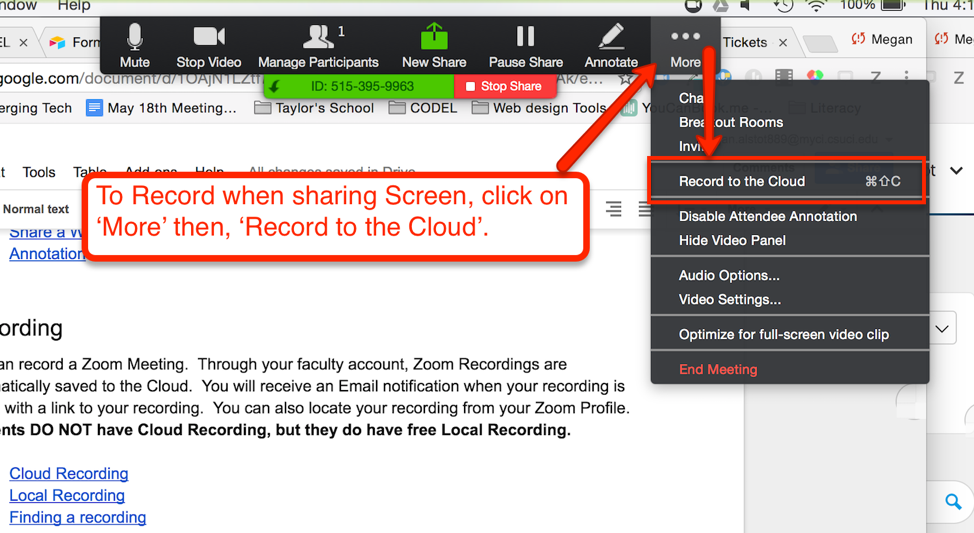
In Screen Sharing View
When sharing your screen with meeting participants, the record button is located at the top of the screen under the ‘More’ button.
Important Notes When Using Zoom for Lecture Capture
If you're using Zoom to capture a live lecture, there are few things to consider:
- If there is a PowerPoint or other presentation material being displayed or projected, be sure to share the screen from the Zoom meeting. If the screen isn't shared, it won't be captured in the recording.
- Take a look at our recommended hardware list to ensure that you're able to adequately capture audio during the lecture.
Additional Resources
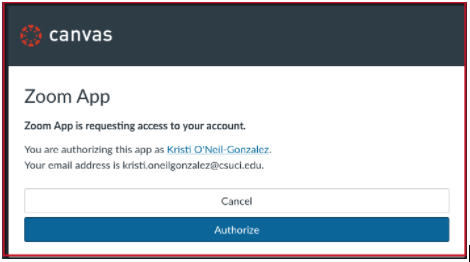
Zoom is now integrated into Canvas courses and can be accessed by faculty from the course menu. Students will access created meetings from the notifications that are sent to the inbox or the course calendar. Note: You must have a Zoom account created before using it in Canvas. You can create your account by signing-in to CSUCI's Zoom instance or clicking the Sign-in to Zoom button at the bottom of this page.
- From within your course, click ‘Zoom’ from the course menu
- Next, click ‘Authenticate’

- Next, click ‘Authorize’
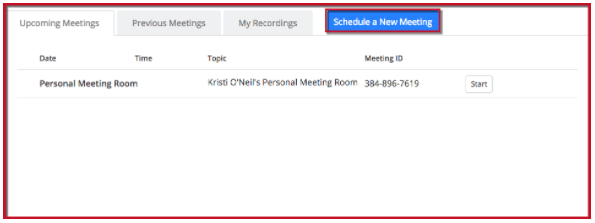
- You will then be taken into the Zoom Scheduler. Click, ‘Schedule a New Meeting’
Refer to the Zoom in Canvas documentation (PDF, 1.4MB) to walkthrough all the features.
Essentials for a Successful Meeting
- Check your connectivity before the meeting
It’s important to make sure that you’re in a place that has stable internet connection when joining a meeting. You can always join a test meeting by going to https://csuci.zoom.us/test and clicking the ‘Join’ button.
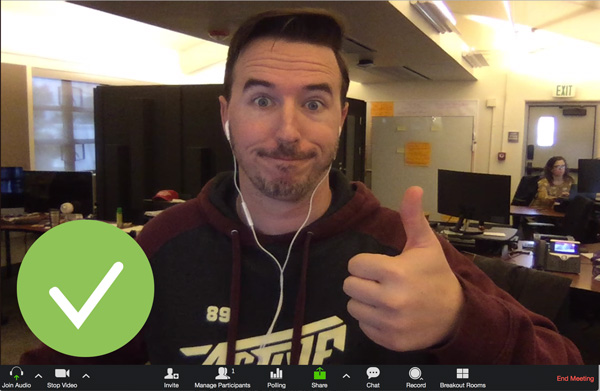
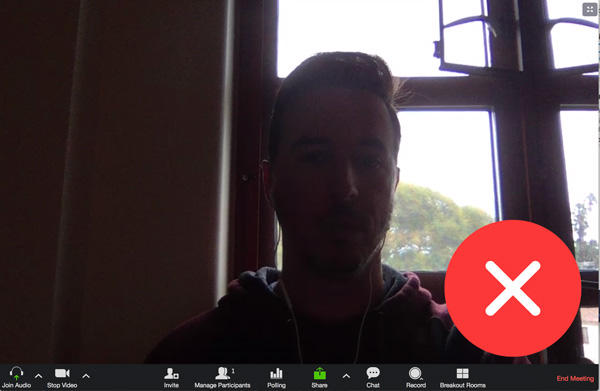
- Check your lighting
Good lighting is important so that others in the meeting are able to see you clearly. Avoid dimly lit areas or sitting directly in front of a window or other bright area as this can lead to you appearing as an ominous silhouette. - Mute yourself when you’re not speaking
Use the mute button when you’re not actively speaking in a meeting. This has multiple benefits such as: it can prevent extraneous echo, reduces distractions from ambient or background noise such as others in a shared office space, shuffling papers, etc.
- Be present and remember that you’re on video
Zoom meetings are often conducted with video, meaning that others can see what you’re doing. So, it’s best to avoid things like eating your lunch or, heaven forbid, changing your clothes you’re in a Zoom meeting. Be present during the meeting and actively engage with the participants of the meeting. If you absolutely need to do something else, turn your camera off for a few moments.
Special Considerations for a Mixed Attendance Meeting
In the event that there are several people in one physical space with others online, it is important to delegate someone to facilitate interaction between the in-person and online attendants. This person will also be able to facilitate other participant controls such as muting those who may have extraneous noise coming through their microphones. Some specific things to consider are:
- Webcam Position
If you're sitting with a group at a conference table, having your webcam sitting at eye level via a laptop isn't going to be idea. Instead, consider using a webcam tripod to raise the angle of the camera slightly and place it at the end of the table so that online participants can see everyone at the table. This makes it easier for online participants to see who's speaking instead of just hearing voices while only being able to see a select few people in the room. - Consider a Second Laptop in the Room
Having a second laptop in addition to whichever computer is serving as the host of the meeting can prove helpful for large group meetings with online participants. For example, if there is a primary computer hooked up in the room that's acting as the host and primary screen sharing machine, it will be difficult to facilitate online interaction such as chat that may be happening. This can easily be remedied by having a secondary laptop also joined in the meeting with the mic muted and video turned off.
- Check your connectivity before the meeting
- Logitech Wide Angle Pro Camera
- Logitech C270 Desktop or Laptop Webcam (cheaper alternative without wide-angle)
- MXL AC404 Conference Microphone
- Headset or Earbuds with inline mic (e.g.: iPhone headphones)
Additional Recommendations for Classroom or Conference Room Settings:
- Revolabs 10-FLXUC500-NA FLX Uc 500 USB Conference Phone
- Extension Cord w/3 outlets for revo and a laptop
- Long USB cable to extend the revo
- USB extension cord for webcam
- Tripod for webcam
TLI offers Zoom workshops every semester to get you started using Zoom. These workshops can be found on our events calendar. You can also view the support documents for our workshops below:
Official Zoom Docs
The University has a variety of images that may be downloaded and used for a virtual background on Zoom and Microsoft Teams. Please feel free to download and use these images as needed.
Questions and Support
CI Solution Center
Department of User Services
Information Technology Services
805-437-8400